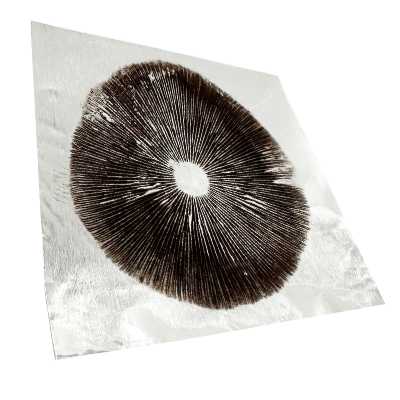
Spore prints are a fascinating and essential tool for mushroom enthusiasts, mycologists, and cultivators. Whether you’re identifying a wild mushroom or preparing spores for future cultivation, creating a spore print is a simple yet rewarding process. In this guide, we’ll walk you through how to make a spore print and provide tips to ensure your results are clean and effective.
What Is a Spore Print?
A spore print is essentially a powdery imprint of a mushroom’s spores, created when the mushroom’s gills (or pores) release them onto a surface. The resulting print reveals the color, pattern, and density of the spores, which can be helpful for identification or cultivation purposes. Spore prints are not only practical but also beautiful, resembling delicate artwork created by nature.
Supplies You’ll Need
Before you start, gather the following materials:
A mature mushroom (ensure it’s fresh and has an intact cap)
A sheet of white paper, black paper, or foil (to contrast with spore colors)
A glass or bowl (optional, but recommended to create a clean environment)
A sterilized knife or scissors
A clean workspace
Optional supplies for long-term storage:
A resealable plastic bag or envelope
Desiccant packets (to keep spores dry)
Step-by-Step Guide to Making a Spore Print
Follow these easy steps to create a spore print:
1. Choose Your Mushroom
Select a mature mushroom with a fully opened cap. Mushrooms that are too young may not release enough spores for a good print. Popular choices include species like Agaricus, Psilocybe, and Panaeolus. If you’re working with wild mushrooms, ensure they’re properly identified and safe to handle.
2. Prepare the Cap
Using a sterilized knife or scissors, carefully remove the stem from the mushroom so that the cap can lay flat. Handle the mushroom gently to avoid damaging the gills or pores.
3. Choose a Surface
Place the mushroom cap gill-side down on your chosen surface. White paper works well for dark-spored mushrooms, while black paper or aluminum foil is ideal for light-spored varieties. Foil is especially useful if you’re planning to store the spores for future use.
4. Cover the Cap
To prevent contamination and ensure the spores settle evenly, cover the mushroom cap with a clean glass or bowl. This creates a controlled environment and minimizes airflow disturbances.
5. Wait for the Spores to Drop
Leave the setup undisturbed for 6-12 hours, or overnight. During this time, the mushroom will release its spores, creating a print on the surface below.
6. Reveal the Spore Print
Carefully lift the mushroom cap and admire your spore print. The pattern and color will depend on the mushroom species and its spore characteristics.
Storing Your Spore Print
If you plan to use the spore print for future cultivation or study, it’s essential to store it properly:
1. Allow the print to dry completely to prevent mold growth.
2. Fold the paper or foil with the print carefully and place it in a resealable plastic bag or envelope.
3. Add a desiccant packet to keep the spores dry.
4. Label the container with the mushroom species and date.
Stored correctly, spore prints can last for years.
Tips for Success
Work in a clean environment: Contamination can ruin your spore print, so sanitize your workspace and tools beforehand. Working in a still air box (click this link to learn how to make your own) can be very helpful.
Choose the right mushroom: Mature caps with intact gills or pores will yield the best results.
Experiment with surfaces: If you’re unsure of the spore color, try using both white and black paper.
Use a microscope for deeper study: If you’re diving into mycology, examining spores under a microscope can reveal even more fascinating details.
Why Make a Spore Print?
Spore prints serve a variety of purposes:
Identification: The spore color and pattern can help distinguish between similar mushroom species.
Cultivation: Spore prints can be used to create spore syringes or start new mushroom cultures.
Artistic projects: The intricate designs of spore prints can be used in art and crafts.
Frequently Asked Questions
Q: Can I use any mushroom to make a spore print?
A: Yes, but some mushrooms, like puffballs, do not produce gills or pores suitable for spore prints. Choose mushrooms with visible gills or pores.
Q: How long do spore prints last?
A: When stored properly in a dry, airtight environment, spore prints can remain viable for years.
Q: Can spore prints be used to grow mushrooms?
A: Absolutely! Spore prints are a starting point for creating spore syringes or inoculating substrates for cultivation.
Final Thoughts
Making a spore print is an engaging and educational activity that connects you to the world of fungi. Whether you’re a hobbyist, a scientist, or an artist, spore prints offer a unique way to explore and appreciate the beauty of mushrooms. With a bit of patience and care, you can create spore prints that are both practical and mesmerizing.
By following this guide, you’ll master the art of making spore prints and open the door to a deeper understanding of the fungal kingdom. Get started today and unlock the incredible potential of spores. Happy printing!
